ラベル Fedora の投稿を表示しています。 すべての投稿を表示

Fedora 23でPXEサーバを立てる

2016/02/14
ネットワークの設定を書き換えずにPXEサーバを立てたい!ということでProxyDHCPを使ったPXEの設定について。

パッケージのインストール
# dnf install dnsmasq syslinux-tftpboot

PXEサーバ設定

/etc/dnsmasq.d/proxy_pxe.conf
# function as a tftp server
enable-tftp

# Don't function as a DNS server:
port=0

# don't bind to 0.0.0.0
bind-interfaces

# root directory for files available via ftp.
tftp-root=/tftpboot

# This range(s) is for the public interface, where dnsmasq functions
# as a proxy DHCP server providing boot information but no IP leases.
# Any ip in the subnet will do, so you may just put your server NIC ip here.
# I used my router ip address
dhcp-range=192.168.1.0, proxy

# kill multicast
dhcp-option=vendor:PXEClient,6,2b

# disable reuse of the dhcp servername and filename fields as extra.
# option space. to avoid confusing some old or broken dhcp clients.
dhcp-no-override

# Log lots of extra information about DHCP transactions.
log-dhcp
log-queries

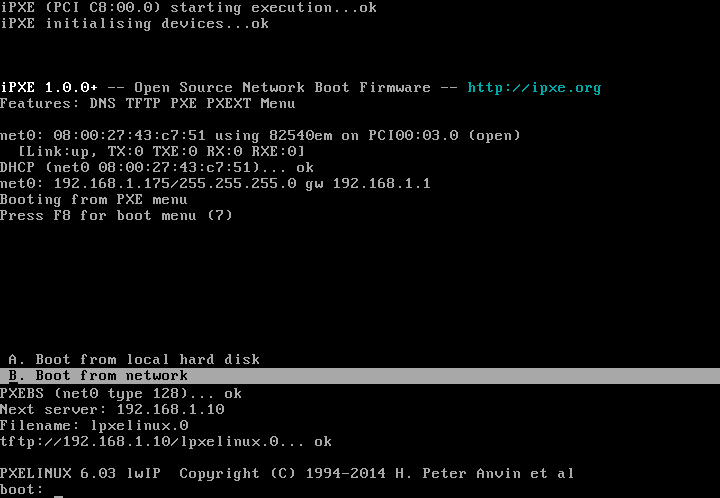
# PXE menu
pxe-prompt="Press F8 for boot menu", 10

# A boot service type of 0 is special, and will abort the
# net boot procedure and continue booting from local media.
pxe-service=X86PC, "Boot from local hard disk", 0

# The known types are x86PC, PC98, IA64_EFI, Alpha, Arc_x86,
# Intel_Lean_Client, IA32_EFI, BC_EFI, Xscale_EFI and X86-64_EFI
pxe-service=X86PC, "Boot from network", lpxelinux


ブートメニューを作る
# mkdir /tftpboot/pxelinux.cfg

/tftpboot/pxelinux.cfg/default
default vesamenu.c32
prompt 1
timeout 100

menu title ########## Boot Menu ##########
#menu background pxelinux.cfg/logo.png

label internet
    menu label ^Install Fedora from InterNET
    kernel http://192.168.1.10/netboot/fedora/vmlinuz
    initrd http://192.168.1.10/netboot/fedora/initrd.img
    append inst.stage2=http://download.fedoraproject.org/pub/fedora/linux/releases/23/Server/x86_64/os/ ip=dhcp

label live
    menu label ^Boot Live Linux(puppy)
    kernel http://192.168.1.10/netboot/puppy/vmlinuz
    initrd http://192.168.1.10/netboot/puppy/initrd.gz
    append root=/dev/ram0

label backup
    menu label backup/recovery(g4l)
    menu default
    linux http://192.168.1.10/netboot/g4l/bz4x3.3
    initrd http://192.168.1.10/netboot/g4l/ramdisk.lzma
    append root=/dev/ram0

label rescue
    menu label ^System Rescue
    linux http://192.168.1.10/netboot/systemrescue/rescue64
    initrd http://192.168.1.10/netboot/systemrescue/initram.igz
    append netboot=http://192.168.1.10/netboot/systemrescue/sysrcd.dat setkmap=jp scandelay=5

label memtest86
    menu label ^Memory test
    kernel memtest86plus
    append -

label local
    menu label ^Boot from Local drive
    localboot 0xffff


ブートイメージの作成

Fedora Install
# mkdir /tftpboot/fedora
# wget http://download.fedoraproject.org/pub/fedora/linux/releases/23/Server/x86_64/os/images/pxeboot/vmlinuz -O /tftpboot/fedora/vmlinuz
# wget http://download.fedoraproject.org/pub/fedora/linux/releases/23/Server/x86_64/os/images/pxeboot/initrd.img -O /tftpboot/fedora/initrd.img


Puppy
# mkdir puppy
# wget http://openlab.jp/puppylinux/download/puppy-5.7.1JP/precise-571JP.iso
# mount -o loop,ro -t iso9660 precise-571JP.iso puppy
# mkdir initrd
# cd initrd
# zcat ../puppy/initrd.gz | cpio -i -H newc -d
5329 blocks
# cp ../puppy/puppy_precise_5.7.1JP.sfs .
# find | cpio -o -H newc | gzip -4 > ../initrd.gz
257025 blocks
# cd ..
# mkdir /tftpboot/puppy
# mv initrd.gz /tftpboot/puppy/.
# cp puppy/vmlinuz /tftpboot/puppy/.


g4l
# mkdir /tftpboot/g4l
# wget http://netix.dl.sourceforge.net/project/g4l/g4l%20ISO%20images/g4l-v0.50.iso
# mount -o loop,ro -t iso9660 g4l-v0.50.iso g4l
# cp g4l/bz4x3.3 /tftpboot/g4l/.
# cp g4l/ramdisk.lzma /tftpboot/g4l/.


SystemRescueCD
# mkdir systemrescuecd
# wget http://jaist.dl.sourceforge.net/project/systemrescuecd/sysresccd-x86/4.7.1/systemrescuecd-x86-4.7.1.iso
# mount -o loop,ro -t iso9660 systemrescuecd-x86-4.7.1.iso systemrescuecd
# mkdir /tftpboot/systemrescuecd
# cp systemrescuecd/sysrcd.dat /tftpboot/systemrescuecd/.
# cp systemrescuecd/sysrcd.md5 /tftpboot/systemrescuecd/.
# cp systemrescuecd/isolinux/initram.igz /tftpboot/systemrescuecd/.
# cp systemrescuecd/isolinux/rescue64 /tftpboot/systemrescuecd/.
# umount systemrescuecd


Windows PE
WinPe-tchのダウンロード等


memtest86+
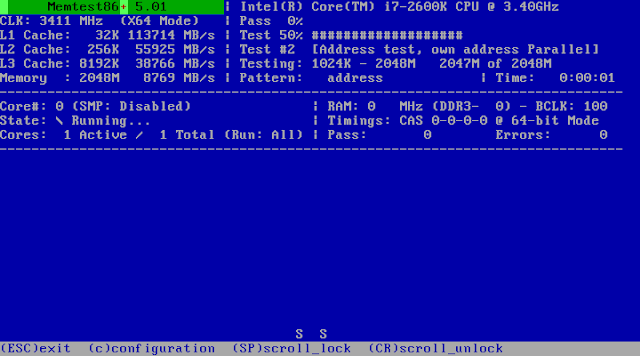
# wget http://www.memtest.org/download/5.01/memtest86+-5.01.zip
# unzip memtest86+-5.01.zip
# mv memtest86+-5.01.bin /tftpboot/memtest86plus


apacheの設定

/etc/httpd/conf.d/netboot.conf
#
# This configuration file maps net boot images
#
Alias /netboot /tftpboot

<location netboot="">
    AllowOverride All
    Require ip 192.168.1.0/24
</location>

SELinuxの設定

/tftpboot に設定されているtftpdir_tにhttpdのアクセス許可を追加するが、セキュリティは大丈夫?気になるなら、イメージは別ディレクトリに移してhttpd_sys_content_tのtcontextを設定するとよい。

pxe.te
module pxe 1.0;

require {
        type httpd_t;
        type tftpdir_t;
        class file { read open getattr };
}

#============= httpd_t ==============
allow httpd_t tftpdir_t:file { read open getattr };
# checkmodule -M -m -o pxe.mod pxe.te
checkmodule:  loading policy configuration from pxe.te
checkmodule:  policy configuration loaded
checkmodule:  writing binary representation (version 17) to pxe.mod
# semodule_package -o pxe.pp -m pxe.mod
# semodule -i pxe.pp
# restorecon -v -R /tftpboot

サービスを起動する
# systemctl start dnsmasq
# systemctl status dnsmasq
● dnsmasq.service - DNS caching server.
   Loaded: loaded (/usr/lib/systemd/system/dnsmasq.service; enabled; vendor preset: disabled)
   Active: active (running) since 金 2016-02-19 00:21:57 JST; 2s ago
 Main PID: 1690 (dnsmasq)
   CGroup: /system.slice/dnsmasq.service
           └─1690 /usr/sbin/dnsmasq -k

 2月 19 00:21:57 fedora.local.nerv.geek.jp systemd[1]: Started DNS caching server..
 2月 19 00:21:57 fedora.local.nerv.geek.jp systemd[1]: Starting DNS caching server....
 2月 19 00:21:57 fedora.local.nerv.geek.jp dnsmasq[1690]: started, version 2.75 DNS disabled
 2月 19 00:21:57 fedora.local.nerv.geek.jp dnsmasq[1690]: compile time options: IPv6 GNU-getopt DBus no-i18n IDN DHCP DHCPv6 no-Lu...notify
 2月 19 00:21:57 fedora.local.nerv.geek.jp dnsmasq-dhcp[1690]: DHCP, proxy on subnet 192.168.1.0
 2月 19 00:21:57 fedora.local.nerv.geek.jp dnsmasq-tftp[1690]: TFTP root is /tftpboot
Hint: Some lines were ellipsized, use -l to show in full.
# systemctl enable dnsmasq
Created symlink from /etc/systemd/system/multi-user.target.wants/dnsmasq.service to /usr/lib/systemd/system/dnsmasq.service.
# systemctl status httpd
● httpd.service - The Apache HTTP Server
   Loaded: loaded (/usr/lib/systemd/system/httpd.service; enabled; vendor preset: disabled)
   Active: active (running) since 木 2016-02-18 22:29:52 JST; 1h 54min ago
 Main PID: 940 (/usr/sbin/httpd)
   Status: "Total requests: 9; Idle/Busy workers 100/0;Requests/sec: 0.00132; Bytes served/sec:  75KB/sec"
   CGroup: /system.slice/httpd.service
           ├─ 940 /usr/sbin/httpd -DFOREGROUND
           ├─1195 /usr/sbin/httpd -DFOREGROUND
           ├─1196 /usr/sbin/httpd -DFOREGROUND
           ├─1197 /usr/sbin/httpd -DFOREGROUND
           ├─1198 /usr/sbin/httpd -DFOREGROUND
           ├─1200 /usr/sbin/httpd -DFOREGROUND
           └─1391 /usr/sbin/httpd -DFOREGROUND

 2月 18 22:29:48 fedora.local.nerv.geek.jp systemd[1]: Starting The Apache HTTP Server...
 2月 18 22:29:51 fedora.local.nerv.geek.jp httpd[940]: [Thu Feb 18 22:29:51.237904 2016] [core:warn] [pid 940] AH00114: Useless us....conf.
 2月 18 22:29:52 fedora.local.nerv.geek.jp systemd[1]: Started The Apache HTTP Server.
Hint: Some lines were ellipsized, use -l to show in full.

ポートを開ける
# firewall-cmd --add-service=http --permanent
# firewall-cmd --add-service=dhcp --permanent
# firewall-cmd --add-service=tftp --permanent
# firewall-cmd --add-service=proxy-dhcp --permanent
# firewall-cmd --reload
or
# firewall-cmd --set-default-zone=trusted
Read more ...

Fedora 21にRedmineをインストール

2015/02/16

パッケージのインストール

SELinuxのためにpassengerはパッケージで入れる。libxml2-devel、libxslt-devel、ImageMagick-develは、gemのインストール痔に必要。
# yum groupinstall 'Development Tools' # yum install setroubleshoot-server setools-console # yum install mariadb-server mariadb-devel # yum install ruby-devel rubygem-bundler mod_passenger # yum install libxml2-devel libxslt-devel ImageMagick-devel # yum install ipa-pgothic-fonts

MariaDB(MySQL)の設定

/etc/my.cnf.d/server.cnf
...... # this is only for the mysqld standalone daemon [mysqld] character-set-server=utf8 ......
/etc/my.cnf.d/mysql-clients.cnf
...... [mysql] default-character-set=utf8 ......

MariaDBの起動とユーザ/テーブルの作成

# systemctl start mariadb # systemctl status mariadb # systemctl enable mariadb Created symlink from /etc/systemd/system/multi-user.target.wants/mariadb.service to /usr/lib/systemd/system/mariadb.service. # mysql_secure_installation # mysql -u root -p MariaDB [(none)]> create database redmine default character set utf8; MariaDB [(none)]> grant all on redmine.* to redmine@localhost identified by '********'; MariaDB [(none)]> flush privileges; MariaDB [(none)]> exit;

Redmineのインストール

# svn co http://svn.redmine.org/redmine/branches/2.5-stable /usr/share/redmine # cd /usr/share/redmine
config/database.yml
production: adapter: mysql2 database: redmine host: localhost username: redmine password: ******** encoding: utf8
config/configuration.yml
production: email_delivery: delivery_method: :smtp smtp_settings: address: "localhost" port: 25 domain: 'example.com' rmagick_font_path: /usr/share/fonts/ipa-pgothic/ipagp.ttf

Gemのインストール

# bundle config build.nokogiri --use-system-libraries# bundle install Don't run Bundler as root. Bundler can ask for sudo if it is needed, and installing your bundle as root will break this application for all non-root users on this machine. Fetching gem metadata from https://rubygems.org/......... Resolving dependencies... Installing rake 10.4.2 Installing i18n 0.6.11 Installing multi_json 1.10.1 Installing activesupport 3.2.21 Installing builder 3.0.4 Installing activemodel 3.2.21 Installing erubis 2.7.0 Installing journey 1.0.4 Installing rack 1.4.5 Installing rack-cache 1.2 Installing rack-test 0.6.3 Installing hike 1.2.3 Installing tilt 1.4.1 Installing sprockets 2.2.3 Installing actionpack 3.2.21 Installing mime-types 1.25.1 Installing polyglot 0.3.5 Installing treetop 1.4.15 Installing mail 2.5.4 Installing actionmailer 3.2.21 Installing arel 3.0.3 Installing tzinfo 0.3.43 Installing activerecord 3.2.21 Installing activeresource 3.2.21 Using bundler 1.7.6 Installing mini_portile 0.6.2 Installing nokogiri 1.6.6.2 Installing xpath 2.0.0 Installing capybara 2.4.4 Installing ffi 1.9.6 Installing childprocess 0.5.5 Installing coderay 1.1.0 Installing rack-ssl 1.3.4 Installing json 1.8.2 Installing rdoc 3.12.2 Installing thor 0.19.1 Installing railties 3.2.21 Installing jquery-rails 3.1.2 Installing metaclass 0.0.4 Installing mocha 1.0.0 Installing mysql2 0.3.17 Installing net-ldap 0.3.1 Installing ruby-openid 2.3.0 Installing rack-openid 1.4.2 Installing rails 3.2.21 Installing rbpdf 1.18.5 Installing redcarpet 2.3.0 Installing request_store 1.0.5 Installing rmagick 2.13.4 Installing rubyzip 1.1.7 Installing websocket 1.2.1 Installing selenium-webdriver 2.44.0 Installing shoulda-context 1.0.2 Installing shoulda-matchers 1.4.1 Installing shoulda 3.3.2 Installing yard 0.8.7.6 Your bundle is complete! Use `bundle show [gemname]` to see where a bundled gem is installed. Post-install message from rmagick: Please report any bugs. See https://github.com/gemhome/rmagick/compare/RMagick_2-13-2...master and https://github.com/rmagick/rmagick/issues/18

Redmineの初期設定とデータベースのテーブル作成

# bundle exec rake generate_secret_token # RAILS_ENV=production bundle exec rake db:migrate

SELinuxまわりの設定

RedmineをSELinuxが有効なCentOS上で動かすには - C#などの技術メモ
http://d.hatena.ne.jp/myoshino2011/20131230/1388416394
# setsebool httpd_run_stickshift 1 # getsebool httpd_run_stickshift httpd_run_stickshift --> on # semanage fcontext -a -s system_u -t httpd_sys_content_t "/usr/share/redmine(.*/)?(.*)" # restorecon -R -F /usr/share/redmine/ # chown -R apache:apache /usr/share/redmine

httpd設定

/etc/httpd/conf.d/redmine.conf
# # Redmine is flexible project management web application. # <virtualhost *:80> ServerName redmine.example.com DocumentRoot /usr/share/redmine/public <directory /usr/share/redmine/public/> <ifmodule mod_authz_core.c> # Apache 2.4 Require ip 192.168.1.0/24 Require ip 127.0.0.1 </IfModule> <ifmodule !mod_authz_core.c> # Apache 2.2 Order Deny,Allow Allow from 192.168.1.0/24 Allow from 127.0.0.1 </IfModule> #Uncomment the next line if using with SSL/TLS #php_flag session.cookie_secure on AllowOverride All </Directory> </VirtualHost> # systemctl start httpd.service # systemctl status httpd.service # systemctl enable httpd.service Created symlink from /etc/systemd/system/multi-user.target.wants/httpd.service to /usr/lib/systemd/system/httpd.service. # firewall-cmd --add-service=http --zone=FedoraServer # firewall-cmd --add-service=http --zone=FedoraServer --permanent
さて、これで起動できるわけだが、[管理]メニューにアクセスするとエラーになる。しかし、1度setenforce 0してからアクセスすると、エラーがでなくなる。SELinuxが関係しているのは間違いなさそうだが、ざっと見動いてるのでもういいや(゚∀゚)
Read more ...

PostGISインストール

2014/11/08
地図情報を外部へ提供し、JavaScriptやQGIS等と連携させるために、PostgreSQLでジオメトリ情報が扱えるように拡張するPostGISを使用する。

インストールと初期設定
# yum install postgis postgresql-server # postgresql-setup initdb Initializing database ... OK # passwd postgres ユーザー postgres のパスワードを変更。 新しいパスワード: 新しいパスワードを再入力してください: passwd: すべての認証トークンが正しく更新できました。
外部からのサーバへの接続を許可する # firewall-cmd --permanent --add-service=postgresql # firewall-cmd --add-service=postgresql
/var/lib/pgsql/data/pg_hba.conf
: : # IPv4 local connections: host all all 127.0.0.1/32 ident host all all 192.168.1.0/24 md5 : :
# vi /var/lib/pgsql/data/postgresql.conf
: : #listen_addresses = 'localhost' # what IP address(es) to listen on; listen_addresses = '*' # comma-separated list of addresses : :
サービスの起動と動作確認 # systemctl start postgresql # systemctl enable postgresql # su - postgres $ echo "select * from postgis_version();" | psql gis postgis_version --------------------------------------- 2.1 USE_GEOS=1 USE_PROJ=1 USE_STATS=1
DBの作成 $ createdb gis -E UTF-8 $ psql -d gis -c "CREATE EXTENSION postgis;" $ psql -d gis -c "CREATE EXTENSION postgis_topology;" $ psql -d gis -c "ALTER USER postgres PASSWORD '********';"
pgAdmin3をインストールする。
pgAdmin: Download - Windows ™

shapeファイルのコンバータをプラグインとして利用する。PostGISの本体に入っている。

Windows版のzipをダウンロードして、binの下のpostgisguiディレクトリをpgAdmin3のインストールディレクトリにコピーする。
Index of /postgis/windows

C:\Program Files (x86)\pgAdmin III\1.18\plugins.d\plugins.iniに下記を追加する。
; ;PostGIS shp2pgsql-gui (Windows): ; Title=PostGIS Shapefile and DBF loader Command="$$PGBINDIR\postgisgui\shp2pgsql-gui.exe" -h "$$HOSTNAME" -p $$PORT -U "$$USERNAME" -d "$$DATABASE" -W "$$PASSWORD" Description=Open a PostGIS ESRI Shapefile or Plain dbf loader console to the current database. KeyFile=$$PGBINDIR\postgisgui\shp2pgsql-gui.exe Platform=windows ServerType=postgresql Database=Yes SetPassword=Yes
pgAdmin3を起動して、[ファイル]-[オプション]で、PG binパスを確認する。


PostGISに接続する。


 プラグインを起動する。


[Add File]をクリックして、読み込むShapeファイルを選択する。


日本語のファイル名は読み込めないので、下記を参考にリネームしておく。
海岸線 CstLine
街区の代表点 SBAPt
街区線 SBBdry
基準点 GCP
軌道の中心線 RailCL
建築物 BldA
建築物の外周線 BldL
行政区画 AdmArea
行政区画界線 AdmBdry
行政区画代表点 AdmPt
水域 WA
水涯線 WL
水部構造物線 WStrL
水部構造物面 WStrA
町字の代表点 CommPt
町字界線 CommBdry
等高線 Cntr
道路縁 RdEdg
道路構成線 RdCompt
標高点 ElevPt

[Options]をクリックし、エンコーディングをCP932(or SHIFT-JIS)指定する。


[Import]をクリックすると読み込みが始まる。完了するとテーブルができている。


動作確認はQGISでやるとよい。
データの格納と表示 — Let's Postgres
Read more ...

Baikal and CalDavZAPでスケジュール管理

2014/10/25
久しぶりにCalDavZapのサイトをのぞいたら、いつの間にか日本語化されてた。作ってくれた人ありがとー。
ということでインスコしていきます。CalDAVサーバはいろいろありますが、GUIのきれーなBaïkalをチョイス。
最近開発止まってるけど大丈夫なのか!?

CalDAV + CardDAV lightweight server: Baïkal
Baikal/INSTALL.md
# wget http://baikal-server.com/get/baikal-regular-0.2.7.tgz # tar zxf baikal-regular-0.2.7.tgz # mv baikal-regular /usr/share/. # yum install php-sabredav-Sabre_CalDAV php-sabredav-Sabre_CardDAV
SELinuxの設定
# yum install policycoreutils-python # chown -R apache:apache /usr/share/baikal-regular # semanage fcontext -a -t httpd_sys_content_t "/usr/share/baikal(.*/)?(.*)?" # semanage fcontext -a -t httpd_sys_rw_content_t "/usr/share/baikal(.*/)?Specific(/.*)?" # restorecon -RFv /usr/share/baikal-regular # touch /usr/share/baikal-regular/Specific/ENABLE_INSTALL
SQLiteでいいという人は以下のmariaDBのインストールはいらない。
# yum install mariadb-server # vi /etc/my.cnf [mysqld] datadir=/var/lib/mysql socket=/var/lib/mysql/mysql.sock # Disabling symbolic-links is recommended to prevent assorted security risks symbolic-links=0 # Settings user and group are ignored when systemd is used. # If you need to run mysqld under a different user or group, # customize your systemd unit file for mysqld/mariadb according to the # instructions in http://fedoraproject.org/wiki/Systemd character-set-server=utf8 : : # systemctl start mariadb # systemctl enable mariadb ln -s '/usr/lib/systemd/system/mariadb.service' '/etc/systemd/system/multi-user.target.wants/mariadb.service' # mysql_secure_installation # mysql -u root -p MariaDB [(none)]> CREATE DATABASE baikal; MariaDB [(none)]> GRANT ALL ON baikal.* TO 'baikal'@'localhost' IDENTIFIED BY '********'; MariaDB [(none)]> exit; # mysql -u root -p -D baikal < /usr/share/baikal-regular/Core/Resources/Db/MySQL/db.sql
PDO(PHP Data Object)
# yum install php-pdo php-mysqlnd # vi /etc/php.ini : : ; Default socket name for local MySQL connects. If empty, uses the built-in ; MySQL defaults. ; http://php.net/pdo_mysql.default-socket pdo_mysql.default_socket=/var/lib/mysql/mysql.sock : :
firewallに穴を開ける。認証があるのでsslを使う必要があるが、設定がうまくいかなかったので平文で勘弁して下さい。
# firewall-cmd --add-service=http # firewall-cmd --permanent --add-service=http
次にWebベースのCalDAVクラアントCalDavZapをインスコ。
自分はThunderbirdなのでWebベースのCalDAVクラアントなんて使わなくていいのですが、世の中(会社)にはWindows Live メールとかCalDAV使えない糞メーラを使い続ける人がいるのでなんとかしないといけません。
CalDavZAP - the open source CalDAV web client
# wget http://www.inf-it.com/CalDavZAP_0.11.1.zip # unzip CalDavZAP_0.11.1.zip # mv caldavzap /usr/share/. # chown -R apache:apache /usr/share/caldavzap # semanage fcontext -a -t httpd_sys_content_t "/usr/share/caldavzap(/.*)?" # restorecon -RFv /usr/share/caldavzap
BaïkalとCalDavZAPで別々にVirtualHost作りたかったけど、cross-domainの設定がどうにもこうにも動かないのでギブアップ。
# vi /etc/httpd/conf.d/baikal.conf # # Baikal and CalDavZAP # <virtualhost *:80> DocumentRoot /usr/share/baikal-regular/html ServerName caldav.sample.jp

RewriteEngine On RewriteCond %{HTTP:Access-Control-Request-Method} !^$ RewriteCond %{REQUEST_METHOD} OPTIONS RewriteRule ^(.*)$ $1 [R=200,L] RewriteRule /.well-known/carddav /card.php [R,L] RewriteRule /.well-known/caldav /cal.php [R,L] <directory "/usr/share/baikal-regular/html"> <ifmodule mod_authz_core.c> # Apache 2.4 Require local Require ip 192.168.1 </IfModule> <ifmodule !mod_authz_core.c> # Apache 2.2 Order Deny,Allow Deny from all Allow from 127.0.0.1 Allow from 192.168.1 </IfModule> </Directory>

Alias /zap /usr/share/caldavzap <directory "/usr/share/caldavzap"> <ifmodule mod_authz_core.c> # Apache 2.4 Require local Require ip 192.168.1 </IfModule> <ifmodule !mod_authz_core.c> # Apache 2.2 Order Deny,Allow Deny from all Allow from 127.0.0.1 Allow from 192.168.1 </IfModule> Options None Options +FollowSymlinks AllowOverride All </Directory> </VirtualHost> # vi /usr/share/caldavzap/config.js : : var globalNetworkCheckSettings={href: 'http://caldav.sample.jp/cal.php/calendars/', hrefLabel: null, additionalResources: [], forceReadOnly: null, settingsAccount: true, timeOut: 30000, lockTimeOut: 10000, delegation: true, backgroundCalendars: [], ignoreAlarms: false} : : var globalUseJqueryAuth=true; : : var globalInterfaceLanguage='ja_JP'; : :

apacheを起動
# systemctl start httpd # systemctl enable httpd ln -s '/usr/lib/systemd/system/httpd.service' '/etc/systemd/system/multi-user.target.wants/httpd.service'
http://caldav.sample.jp/にアクセスするとインスコが始まる。

なんかエラーが出てるけど見なかったことに。

インスコ完了後にログインした管理画面。

カレンダーには、http://caldav.sample.jp/zap/でアクセスする。
Read more ...

epgrecUNA on Fedora 20

2014/05/07
epgrecUNAをFedoraで動かす上で困るのは、カーネルのアップデート毎にpt1_drvをビルドする必要があるのと、SELinuxが有効の環境ではepgrecUNAが動かない。そこでモジュールを自動でビルドするためにDKMSを使用する。また、クリーンインストールする機会があったので、epgrecUNA用のポリシーも作ってみた。

DKMS

pt1_drvのソースを配置する。Makefileとかいじったような気もするけど、前の環境からコピってきてるので、どこをいじったかよくわからない。他の情報も参考にしつつ、ビルドできるようにいい感じに修正して下さいすみません。
# tree -A /usr/src/pt1_drv-1.1.0 /usr/src/pt1_drv-1.1.0 ├── dkms.conf └── src ├── Makefile ├── etc │ └── 99-pt1.rules ├── modules.order ├── pt1_com.h ├── pt1_i2c.c ├── pt1_i2c.h ├── pt1_ioctl.h ├── pt1_pci.c ├── pt1_pci.h ├── pt1_tuner.c ├── pt1_tuner.h ├── pt1_tuner_data.c └── pt1_tuner_data.h # ln /usr/src/pt1_drv-1.1.0/src/etc/99-pt1.rules /etc/udev/rules.d/99-pt1.rules
pt1_drvは、もともとあるearth-pt1とかぶっているので、earth-pt1を無効にしないと読み込まれない
# echo "blacklist earth-pt1" >> /etc/modprobe.d/blacklist.conf
DKMSパッケージをインスコ
# yum install dkms
dkms.confを書く
# cat /usr/src/pt1_drv-1.1.0/dkms.conf #パッケージの名前 PACKAGE_NAME="pt1_drv" #パッケージのバージョン PACKAGE_VERSION="1.1.0" #ビルドするコマンド MAKE="cd src/ && BUILD_KERNEL=${kernelver} make" #中間ファイルの削除コマンド CLEAN="cd src/ && make clean" #作成されるモジュールの名前(拡張子.koは付けない) BUILT_MODULE_NAME="pt1_drv" #モジュールが作成される場所(ソースディレクトリからの相対パス) BUILT_MODULE_LOCATION="src/" #元々のインストール先(/lib/modules/`uname -r`をルートとしたパス) DEST_MODULE_LOCATION="/kernel/drivers/video/" REMAKE_INITRD="yes" #自動更新の有効化 AUTOINSTALL="yes"
add! build! install!
# dkms add -m pt1_drv -v 1.1.0 Creating symlink /var/lib/dkms/pt1_drv/1.1.0/source -> /usr/src/pt1_drv-1.1.0 DKMS: add completed.
# dkms build -m pt1_drv -v 1.1.0 Kernel preparation unnecessary for this kernel. Skipping... Building module: cleaning build area... cd src/ && BUILD_KERNEL=3.14.2-200.fc20.x86_64 make... cleaning build area... DKMS: build completed.
# dkms install -m pt1_drv -v 1.1.0 pt1_drv: Running module version sanity check. - Original module - No original module exists within this kernel - Installation - Installing to /lib/modules/3.14.2-200.fc20.x86_64/extra/ Adding any weak-modules depmod... Backing up initramfs-3.14.2-200.fc20.x86_64.img to /boot/initramfs-3.14.2-200.fc20.x86_64.img.old-dkms Making new initramfs-3.14.2-200.fc20.x86_64.img (If next boot fails, revert to initramfs-3.14.2-200.fc20.x86_64.img.old-dkms image) dracut........ DKMS: install completed.
yumでカーネルのアップデートがあった場合には、勝手にビルドしてくれるサービスを起動。いらないかも?
# systemctl start dkms # systemctl status dkms dkms.service - Builds and install new kernel modules through DKMS Loaded: loaded (/usr/lib/systemd/system/dkms.service; enabled) Active: active (exited) since 月 2014-05-12 23:22:07 JST; 5s ago Docs: man:dkms(8) Process: 20572 ExecStart=/bin/sh -c dkms autoinstall --verbose --kernelver $(uname -r) (code=exited, status=0/SUCCESS) Main PID: 20572 (code=exited, status=0/SUCCESS) # systemctl enable dkms ln -s '/usr/lib/systemd/system/dkms.service' '/etc/systemd/system/multi-user.target.wants/dkms.service'

ポリシー

何か足りないかもしれないけど、一応これでひと通り動いてる
# cat epgrecUNA.te module epgrecUNA 1.0; require { type httpd_t; type httpd_sys_script_t; type unconfined_t; type shadow_t; type device_t; type crond_t; type crond_var_run_t; type user_cron_spool_t; type user_tmpfs_t; class process signal; class msgq { unix_read destroy create }; class file { read write create setattr getattr open unlink }; class dir { write search read add_name remove_name open getattr }; class sem { unix_read read write unix_write associate }; class shm { unix_read read write unix_write associate getattr }; class chr_file { read ioctl open }; } allow httpd_t shadow_t:file { read getattr open }; allow httpd_t user_cron_spool_t:dir { write search read add_name remove_name open getattr }; allow httpd_t user_cron_spool_t:file { open create setattr unlink }; allow httpd_t crond_t:process signal; allow httpd_t crond_var_run_t:file { read open }; allow httpd_t unconfined_t:sem { unix_read read unix_write write associate }; allow httpd_t unconfined_t:shm { unix_read read unix_write write associate getattr }; allow httpd_sys_script_t device_t:chr_file { read ioctl open }; allow httpd_sys_script_t self:msgq { unix_read destroy create }; allow httpd_t user_tmpfs_t:file { read write };
ポリシーのコンパイルとインストールは、下記を使わせてもらいましょう
SELinux - Take's Wiki
# ./installSELPolicy epgrecUNA # setsebool -P httpd_mod_auth_pam 1 # semanage fcontext -a -t httpd_sys_content_t "/usr/share/epgrecUNA(/.*)?" # restorecon -RF /usr/share/epgrecUNA
動かない時は、以下で足りないポリシーを探して追加する
# setenforce 0 (動かなかった動作をもう一度。それでも動かない場合は、SELinux以外の原因と思われ) # setenforce 1 # sealert -l* # grep httpd /var/log/audit/audit.log | audit2allow -M mypol # cat mypol.te
あとffmpegは、rpmfusionリポジトリを追加しないと入らない
# rpm -ivh http://download1.rpmfusion.org/free/fedora/rpmfusion-free-release-stable.noarch.rpm # yum install ffmpeg
Read more ...

Drupal 7 の CKEditor を設定する

2013/07/27
DrupalのWysiwygエディタといえばCKEditor。モジュールは、WysiwygCKEditorがあるが、Fedoraならyumでサクッと入るのでCKEditorを使用する。手動でもtarを展開するだけで入る。
# yum install drupal7-ckeditor CKEditor本体のckeditor.noarchも依存で入る。いつものようにモジュールを有効にして設定。

ホーム › 管理 › 環境設定 › コンテンツ作成 > CKEditor (admin/config/content/ckeditor)
ckediter02
ckediter03

上記で、テキストフォーマットとプロフィール(CKEditorの設定)をバインドする。プロフィールは追加できるので、必要ならテキストフォーマット毎にCKEditorの設定が可能。
ここまででこんな感じ。
ckediter01

画像をftpなどでアップロードするのは不便なので、IMCEを入れる。もうわざわざ説明するまでもないので、サクッと設定しちゃって下さい。
ckediter06

コンテンツを作成する際、細かい所はソース(HTML)を編集して調整するので、CKEditerのプラグインCodeMirrorを入れてSyntax Highlightさせる。
CKEditorをyumで入れた場合は、/usr/share/drupal7/modules/ckeditorに入っているので、その下の/usr/share/drupal7/modules/ckeditor/pluginsにダウンロードしたzipを展開する。/usr/share/drupal7/modules/ckeditor/ckeditor/pluginsではないので注意する。
先ほどのCKEditorの設定のEditor appearanceの項目で、プラグインを有効にする。
ckediter04

ソースがHighlightするようになった。
ckediter05

コンテンツもHighlightさせたいのでSyntax Highlighterを入れる。Syntaxhighlighter本体も入れないと、プラグインが有効にならないので注意する。ちなみに本体は/usr/share/drupal7/sites/all/librariesに入れる。
次にSyntaxhighlighterのタグを挿入するSyntaxhighlighter InterfaceプラグインをCKEditerに入れる。展開すると、奥の方にplugins/syntaxhighlightがあるので、例によって/usr/share/drupal7/modules/ckeditor/pluginsの下に移動して、先ほどと同じようにプラグインを有効にする。
ckediter07

すると、Syntaxhighlighterのタグを挿入するボタンが出現・・・しない!
というわけで、/usr/share/drupal7/modules/ckeditor/plugins/syntaxhighlight/plugin.jsに、下記のようにiconのプロパティを追加する。下のほうに同じ行があるのでコピペってやればよい。
editor.ui.addButton && editor.ui.addButton( 'Syntaxhighlight', { label : editor.lang.syntaxhighlight.title, command : 'syntaxhighlightDialog', toolbar : 'insert,98' icon: this.path + 'icons/syntaxhighlight.png', } );
アイコンが出てきたので、toolbarに追加する。
ckediter08

CKEditerを起動してボタンを押すと、下記のダイアログがポップアップする。
ckediter09

保存すれば、Syntax Highlightされたコンテンツが表示される。
ckediter10
Read more ...

Fedora 18 で Calipso

2013/03/16
いつも使ってるのは drupal なんですが、Calipso を使ってみたくなった。

node.js のインストール


まずは node.js から。
yum でインストール場合
# yum install nodejs npm GitHub から落としてきてビルドする場合
# git clone https://github.com/joyent/node.git # yum install gcc-c++ openssl-devel # cd node # ls AUTHORS CONTRIBUTING.md LICENSE README.md common.gypi deps lib src tools BSDmakefile ChangeLog Makefile benchmark configure doc node.gyp test vcbuild.bat # export PYTHON=/usr/bin/python # $PYTHON ./configure # make # make install

MongoDB のインストール


mongoDBのも、yum でさくっと入る。
# yum install mongodb-server
依存関係で追加されるパッケージは以下
 boost-chrono
 boost-filesystem
 boost-program-options
 boost-system
 boost-thread
 gperftools-libs
 libmongodb
 libunwind
 mongodb
 snappy
 v8

サービスを起動する
# systemctl enable mongod.service ln -s '/usr/lib/systemd/system/mongod.service' '/etc/systemd/system/multi-user.target.wants/mongod.service' # systemctl start mongod.service # ps -ef | grep mongod mongodb 14801 1 2 17:09 ? 00:00:02 /usr/bin/mongod --quiet -f /etc/mongodb.conf run root 14842 14380 0 17:11 pts/2 00:00:00 grep --color=auto mongod
動作確認
# mongo MongoDB shell version: 2.2.3 connecting to: test Welcome to the MongoDB shell. For interactive help, type "help". For more comprehensive documentation, see http://docs.mongodb.org/ Questions? Try the support group http://groups.google.com/group/mongodb-user > use test switched to db test > db.foo.find() > db.foo.save({a: 1}) > db.foo.find() { "_id" : ObjectId("5144296efe6aab3b2eae5a85"), "a" : 1 } > db.foo.update( {a: 1}, {a: 5}) > db.foo.find() { "_id" : ObjectId("5144296efe6aab3b2eae5a85"), "a" : 5 } > exit bye

calipso のインストール


npm を使ってダウンロード&インストール
# npm install calipso -g
サイト作成
# mkdir /var/www/html/calipso # calipso site /var/www/html/calipso
サーバ起動
# cd /var/www/html/calipso # calipso server server.port=3000 Launching calipso from: /var/www/html/calipso Calipso directory: /usr/local/lib/node_modules/calipso/lib/../ _ _ ___ __ _| (_)_ __ ___ ___ / __|/ _` | | | '_ \/ __|/ _ \ | (__| (_| | | | |_) \__ \ (_) | \___|\__,_|_|_| .__/|___/\___/ |_| Calipso version: 0.3.17 Calipso configured for: development environment. Calipso server listening on port: 3000 16 Mar 19:48:25 - info: Saving configuration ... 16 Mar 19:48:25 - info: Reloading updated configuration ... 16 Mar 19:48:25 - info: Installing module content 16 Mar 19:48:25 - info: Installing module contentTypes 16 Mar 19:48:25 - info: Installing module permissions 16 Mar 19:48:25 - info: Installing module user 16 Mar 19:48:25 - debug: NOTE: bcrypt is not available. 16 Mar 19:48:25 - info: Content module installed ... 16 Mar 19:48:25 - info: Content types module installed ... 16 Mar 19:48:25 - info: User module installed ... 16 Mar 19:48:25 - info: User Roles sub-module installed ... 16 Mar 19:51:00 - info: No Calipso module routes matched the current URL /css/login-icons.css 16 Mar 20:04:53 - info: No Calipso module routes matched the current URL /css/login-icons.css 16 Mar 20:08:11 - debug: ValidationError: Validator "required" failed for path alias 16 Mar 20:11:05 - debug: ValidationError: Validator "required" failed for path alias
初期設定


できた!


まだいろいろと不安定っぽい。
Read more ...