Fedora 23でPXEサーバを立てる

2016/02/14
ネットワークの設定を書き換えずにPXEサーバを立てたい!ということでProxyDHCPを使ったPXEの設定について。

パッケージのインストール
# dnf install dnsmasq syslinux-tftpboot

PXEサーバ設定

/etc/dnsmasq.d/proxy_pxe.conf
# function as a tftp server
enable-tftp

# Don't function as a DNS server:
port=0

# don't bind to 0.0.0.0
bind-interfaces

# root directory for files available via ftp.
tftp-root=/tftpboot

# This range(s) is for the public interface, where dnsmasq functions
# as a proxy DHCP server providing boot information but no IP leases.
# Any ip in the subnet will do, so you may just put your server NIC ip here.
# I used my router ip address
dhcp-range=192.168.1.0, proxy

# kill multicast
dhcp-option=vendor:PXEClient,6,2b

# disable reuse of the dhcp servername and filename fields as extra.
# option space. to avoid confusing some old or broken dhcp clients.
dhcp-no-override

# Log lots of extra information about DHCP transactions.
log-dhcp
log-queries

# PXE menu
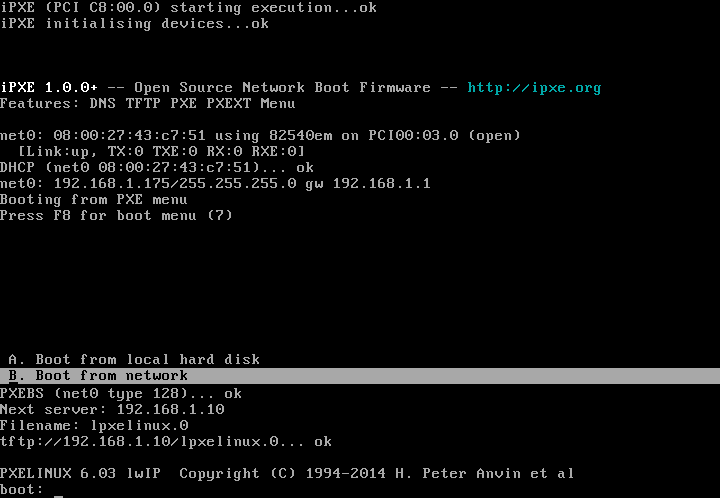
pxe-prompt="Press F8 for boot menu", 10

# A boot service type of 0 is special, and will abort the
# net boot procedure and continue booting from local media.
pxe-service=X86PC, "Boot from local hard disk", 0

# The known types are x86PC, PC98, IA64_EFI, Alpha, Arc_x86,
# Intel_Lean_Client, IA32_EFI, BC_EFI, Xscale_EFI and X86-64_EFI
pxe-service=X86PC, "Boot from network", lpxelinux


ブートメニューを作る
# mkdir /tftpboot/pxelinux.cfg

/tftpboot/pxelinux.cfg/default
default vesamenu.c32
prompt 1
timeout 100

menu title ########## Boot Menu ##########
#menu background pxelinux.cfg/logo.png

label internet
    menu label ^Install Fedora from InterNET
    kernel http://192.168.1.10/netboot/fedora/vmlinuz
    initrd http://192.168.1.10/netboot/fedora/initrd.img
    append inst.stage2=http://download.fedoraproject.org/pub/fedora/linux/releases/23/Server/x86_64/os/ ip=dhcp

label live
    menu label ^Boot Live Linux(puppy)
    kernel http://192.168.1.10/netboot/puppy/vmlinuz
    initrd http://192.168.1.10/netboot/puppy/initrd.gz
    append root=/dev/ram0

label backup
    menu label backup/recovery(g4l)
    menu default
    linux http://192.168.1.10/netboot/g4l/bz4x3.3
    initrd http://192.168.1.10/netboot/g4l/ramdisk.lzma
    append root=/dev/ram0

label rescue
    menu label ^System Rescue
    linux http://192.168.1.10/netboot/systemrescue/rescue64
    initrd http://192.168.1.10/netboot/systemrescue/initram.igz
    append netboot=http://192.168.1.10/netboot/systemrescue/sysrcd.dat setkmap=jp scandelay=5

label memtest86
    menu label ^Memory test
    kernel memtest86plus
    append -

label local
    menu label ^Boot from Local drive
    localboot 0xffff


ブートイメージの作成

Fedora Install
# mkdir /tftpboot/fedora
# wget http://download.fedoraproject.org/pub/fedora/linux/releases/23/Server/x86_64/os/images/pxeboot/vmlinuz -O /tftpboot/fedora/vmlinuz
# wget http://download.fedoraproject.org/pub/fedora/linux/releases/23/Server/x86_64/os/images/pxeboot/initrd.img -O /tftpboot/fedora/initrd.img


Puppy
# mkdir puppy
# wget http://openlab.jp/puppylinux/download/puppy-5.7.1JP/precise-571JP.iso
# mount -o loop,ro -t iso9660 precise-571JP.iso puppy
# mkdir initrd
# cd initrd
# zcat ../puppy/initrd.gz | cpio -i -H newc -d
5329 blocks
# cp ../puppy/puppy_precise_5.7.1JP.sfs .
# find | cpio -o -H newc | gzip -4 > ../initrd.gz
257025 blocks
# cd ..
# mkdir /tftpboot/puppy
# mv initrd.gz /tftpboot/puppy/.
# cp puppy/vmlinuz /tftpboot/puppy/.


g4l
# mkdir /tftpboot/g4l
# wget http://netix.dl.sourceforge.net/project/g4l/g4l%20ISO%20images/g4l-v0.50.iso
# mount -o loop,ro -t iso9660 g4l-v0.50.iso g4l
# cp g4l/bz4x3.3 /tftpboot/g4l/.
# cp g4l/ramdisk.lzma /tftpboot/g4l/.


SystemRescueCD
# mkdir systemrescuecd
# wget http://jaist.dl.sourceforge.net/project/systemrescuecd/sysresccd-x86/4.7.1/systemrescuecd-x86-4.7.1.iso
# mount -o loop,ro -t iso9660 systemrescuecd-x86-4.7.1.iso systemrescuecd
# mkdir /tftpboot/systemrescuecd
# cp systemrescuecd/sysrcd.dat /tftpboot/systemrescuecd/.
# cp systemrescuecd/sysrcd.md5 /tftpboot/systemrescuecd/.
# cp systemrescuecd/isolinux/initram.igz /tftpboot/systemrescuecd/.
# cp systemrescuecd/isolinux/rescue64 /tftpboot/systemrescuecd/.
# umount systemrescuecd


Windows PE
WinPe-tchのダウンロード等


memtest86+
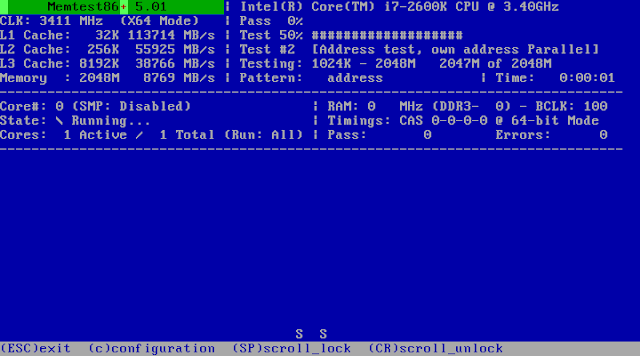
# wget http://www.memtest.org/download/5.01/memtest86+-5.01.zip
# unzip memtest86+-5.01.zip
# mv memtest86+-5.01.bin /tftpboot/memtest86plus


apacheの設定

/etc/httpd/conf.d/netboot.conf
#
# This configuration file maps net boot images
#
Alias /netboot /tftpboot

<location netboot="">
    AllowOverride All
    Require ip 192.168.1.0/24
</location>

SELinuxの設定

/tftpboot に設定されているtftpdir_tにhttpdのアクセス許可を追加するが、セキュリティは大丈夫?気になるなら、イメージは別ディレクトリに移してhttpd_sys_content_tのtcontextを設定するとよい。

pxe.te
module pxe 1.0;

require {
        type httpd_t;
        type tftpdir_t;
        class file { read open getattr };
}

#============= httpd_t ==============
allow httpd_t tftpdir_t:file { read open getattr };
# checkmodule -M -m -o pxe.mod pxe.te
checkmodule:  loading policy configuration from pxe.te
checkmodule:  policy configuration loaded
checkmodule:  writing binary representation (version 17) to pxe.mod
# semodule_package -o pxe.pp -m pxe.mod
# semodule -i pxe.pp
# restorecon -v -R /tftpboot

サービスを起動する
# systemctl start dnsmasq
# systemctl status dnsmasq
● dnsmasq.service - DNS caching server.
   Loaded: loaded (/usr/lib/systemd/system/dnsmasq.service; enabled; vendor preset: disabled)
   Active: active (running) since 金 2016-02-19 00:21:57 JST; 2s ago
 Main PID: 1690 (dnsmasq)
   CGroup: /system.slice/dnsmasq.service
           └─1690 /usr/sbin/dnsmasq -k

 2月 19 00:21:57 fedora.local.nerv.geek.jp systemd[1]: Started DNS caching server..
 2月 19 00:21:57 fedora.local.nerv.geek.jp systemd[1]: Starting DNS caching server....
 2月 19 00:21:57 fedora.local.nerv.geek.jp dnsmasq[1690]: started, version 2.75 DNS disabled
 2月 19 00:21:57 fedora.local.nerv.geek.jp dnsmasq[1690]: compile time options: IPv6 GNU-getopt DBus no-i18n IDN DHCP DHCPv6 no-Lu...notify
 2月 19 00:21:57 fedora.local.nerv.geek.jp dnsmasq-dhcp[1690]: DHCP, proxy on subnet 192.168.1.0
 2月 19 00:21:57 fedora.local.nerv.geek.jp dnsmasq-tftp[1690]: TFTP root is /tftpboot
Hint: Some lines were ellipsized, use -l to show in full.
# systemctl enable dnsmasq
Created symlink from /etc/systemd/system/multi-user.target.wants/dnsmasq.service to /usr/lib/systemd/system/dnsmasq.service.
# systemctl status httpd
● httpd.service - The Apache HTTP Server
   Loaded: loaded (/usr/lib/systemd/system/httpd.service; enabled; vendor preset: disabled)
   Active: active (running) since 木 2016-02-18 22:29:52 JST; 1h 54min ago
 Main PID: 940 (/usr/sbin/httpd)
   Status: "Total requests: 9; Idle/Busy workers 100/0;Requests/sec: 0.00132; Bytes served/sec:  75KB/sec"
   CGroup: /system.slice/httpd.service
           ├─ 940 /usr/sbin/httpd -DFOREGROUND
           ├─1195 /usr/sbin/httpd -DFOREGROUND
           ├─1196 /usr/sbin/httpd -DFOREGROUND
           ├─1197 /usr/sbin/httpd -DFOREGROUND
           ├─1198 /usr/sbin/httpd -DFOREGROUND
           ├─1200 /usr/sbin/httpd -DFOREGROUND
           └─1391 /usr/sbin/httpd -DFOREGROUND

 2月 18 22:29:48 fedora.local.nerv.geek.jp systemd[1]: Starting The Apache HTTP Server...
 2月 18 22:29:51 fedora.local.nerv.geek.jp httpd[940]: [Thu Feb 18 22:29:51.237904 2016] [core:warn] [pid 940] AH00114: Useless us....conf.
 2月 18 22:29:52 fedora.local.nerv.geek.jp systemd[1]: Started The Apache HTTP Server.
Hint: Some lines were ellipsized, use -l to show in full.

ポートを開ける
# firewall-cmd --add-service=http --permanent
# firewall-cmd --add-service=dhcp --permanent
# firewall-cmd --add-service=tftp --permanent
# firewall-cmd --add-service=proxy-dhcp --permanent
# firewall-cmd --reload
or
# firewall-cmd --set-default-zone=trusted
Read more ...

JavaScriptで空間演算

2015/03/04
先日FirefoxとQGISで行った位置情報の取得・加工を、JavaScriptで行ってみる。
スクレイピングにはnode-horsemanを使用した。Nightmareによく似た使いやすいモジュール。結果をGeoJSON形式で出力する。1ページ5秒のウエイトと、結果に5000件の制限を設けてある。
var fs = require('fs');

var Horseman = require('node-horseman');
var horseman = new Horseman();

var results = [];

function getResult() {
    return horseman
        .evaluate(function() {
            var features = [];
            $('table[id="searchResult"] tbody tr:gt(1)').each(function(item) {
                var lat = $.trim($(this).find('td:eq(4)').text()).split("°");
                var lat_deg = parseFloat(lat[0]);
                lat = lat[1].split("′");
                var lat_min = parseFloat(lat[0]) / 60;
                lat = lat[1].split("″");
                var lat_sec = parseFloat(lat[0]) / 3600;
                var lng = $.trim($(this).find('td:eq(5)').text()).split("°");
                var lng_deg = parseFloat(lng[0]);
                lng = lng[1].split("′");
                var lng_min = parseFloat(lng[0]) / 60;
                lng = lng[1].split("″");
                var lng_sec = parseFloat(lng[0]) / 3600;

                var feature = {
                    'type': 'Feature',
                    'geometry': {
                        'type': 'Point',
                        'coordinates': [
                            (lng_deg + lng_min + lng_sec),
                            (lat_deg + lat_min + lat_sec)
                        ]
                    },
                    'properties': {
                        'id' :            $.trim($(this).find('td:eq(0) a').text()),
                        'project' :       $.trim($(this).find('td:eq(1)').text()),
                        'investigation' : $.trim($(this).find('td:eq(2)').text()),
                        'organization' :  $.trim($(this).find('td:eq(3)').text()),
                        'length' :        $.trim($(this).find('td:eq(6)').text()),
                        'elevation' :     $.trim($(this).find('td:eq(7)').text()),
                        'fig' :           $.trim($(this).find('td:eq(8) a').attr("href")),
                        'result' :        $.trim($(this).find('td:eq(9) a').attr("href")),
                        'xml' :           $.trim($(this).find('td:eq(0) a').attr("href"))
                    }
                };
                features.push(feature);
            });
            return features;
        });
}

function hasNextPage() {
    return horseman.exists('td.nextLink a');
}

function scrape() {
    var result = getResult();
    results = results.concat(result);
    var page = horseman
        .evaluate(function() {
            return $('td.pageCount').text();
        });
    console.log(page);
    if (hasNextPage() && results.length < 5000){
        horseman
            .click('td.nextLink a')
            .waitForNextPage()
            .wait(5000);
        scrape();
    }
}

horseman
    .userAgent("Mozilla/5.0 (Windows NT 6.3; WOW64; rv:35.0) Gecko/20100101 Firefox/35.0")
    .viewport(1024, 768)
    .open('http://www.kunijiban.pwri.go.jp/jp/denshikokudo/DB_Search/boringsearch.php')
    .type('input[name="tl_lat_deg"]', '34')
    .type('input[name="tl_lat_min"]', '23')
    .type('input[name="tl_lat_sec"]', '52')
    .type('input[name="tl_lon_deg"]', '131')
    .type('input[name="tl_lon_min"]', '54')
    .type('input[name="tl_lon_sec"]', '03')

    .type('input[name="br_lat_deg"]', '32')
    .type('input[name="br_lat_min"]', '51')
    .type('input[name="br_lat_sec"]', '40')
    .type('input[name="br_lon_deg"]', '133')
    .type('input[name="br_lon_min"]', '52')
    .type('input[name="br_lon_sec"]', '03')
    .click('input[value="検索"]')
    .waitForSelector('td.nextLink a')
//    .screenshot('kunijiban.png');

scrape();

var GeoJSON = {
    "type": "FeatureCollection",
    "crs": {
        "type": "name",
        "properties": {
            "name": "urn:ogc:def:crs:EPSG::4612"
        }
    },
    "features": results
};

fs.writeFile('kunijiban.geojson', JSON.stringify(GeoJSON, null, "    "));

horseman.close();

次に行政区域の境界のバッファを作成して、空間演算により取得した検索結果のうち、愛媛県のみを抽出する。

行政区域の地形データはQGISで作成してもよいが、下記のGeoJSONを使用した。

dataofjapan/land


空間演算には下記のモジュールを使用した。

bjornharrtell/jsts
JSTS Example

下記のhtmlをローカルに置いてブラウザで読みこめば、同じディレクトリにあるjapan.geojson, kunijiban.geojsonを読み込んで地図上に表示する。ただしFirefoxとChromeのみ(Chromeはローカルファイルが読めるように、"--allow-file-access-from-files"オプションを付けて起動する必要がある)。空間演算が割と重くて時間がかかるので、ハングしたようになるかも。
<!DOCTYPE html>
<html>

<head>
    <title>ボーリング柱状図</title>
    <meta charset="utf-8" />
    <meta name="viewport" content="width=device-width, initial-scale=1.0">

    <link rel="stylesheet" href="http://cdn.leafletjs.com/leaflet-0.7.3/leaflet.css" />

    <script src="http://cdn.leafletjs.com/leaflet-0.7.3/leaflet.js"></script>
    <script src="http://code.jquery.com/jquery-2.1.0.min.js"></script>
    <script src="https://rawgithub.com/bjornharrtell/jsts/master/lib/javascript.util.js"></script>
    <script src="https://rawgithub.com/bjornharrtell/jsts/master/lib/jsts.js"></script>

    <link rel="kunijiban" type="application/json" href="kunijiban.geojson">
    <link rel="japan" type="application/json" href="japan.geojson">

    <style>
        html,
        body,
        #map {
            height: 100%;
            width: 100%;
            padding: 0px;
            margin: 0px;
        }
    </style>
</head>

<body>
    <div id="map"></div>

    <script>
        var map = L.map('map').setView([33.523342, 132.863776], 10);
        L.control.scale({'position':'bottomleft','metric':true,'imperial':false}).addTo(map);

        var distance = 5 / 111.12; // 5km
        var geoReader = new jsts.io.GeoJSONReader(),
            geoWriter = new jsts.io.GeoJSONWriter();

        var cyber = L.tileLayer('http://cyberjapandata.gsi.go.jp/xyz/std/{z}/{x}/{y}.png', {
            maxZoom: 18,
            attribution: '<a href="http://www.gsi.go.jp/kikakuchousei/kikakuchousei40182.html" target="_blank">国土地理院</a>'
        }).addTo(map);
        map.addLayer(cyber);

        var gbank = L.tileLayer.wms("https://gbank.gsj.jp/ows/seamlessgeology200k_b", {
            layers: ['area,line,label'],
            format: 'image/png',
            transparent: true,
            opacity: 0.5,
            attribution: '<a href="https://gbank.gsj.jp/seamless/" target="_blank">シームレス地質図</a>'
        }).addTo(map);
        map.addLayer(gbank);

        L.control.layers({'地理院地図': cyber}, {'シームレス地質図': gbank}).addTo(map);

        function onEachFeature(feature, layer) {
            var popupContent = '<p><a href="' + feature.properties.fig + '" target="_blank">';
            popupContent += feature.properties.id + '</a><br />';
            popupContent += feature.properties.investigation + '</p>';

            layer.bindPopup(popupContent);
        }

        function createRegionBuffer() {
            return new Promise(function (resolve, reject) {
                $.getJSON($('link[rel="japan"]').attr("href"), function(data) {
                    var district;
                    data.features.forEach(function(item, index) {
                        if (item.properties.nam_ja == '愛媛県') district = item;
                    });
                    resolve(geoReader.read(district.geometry).buffer(distance));
                });
            });
        }

        function readBoringData(region) {
            return new Promise(function (resolve, reject) {
                $.getJSON($('link[rel="kunijiban"]').attr("href"), function(data) {
                    var inRegion = data.features.filter(function(item, index) {
                        return geoReader.read(item.geometry).within(region);
                    });
                    resolve(inRegion);
                });
            });
        }

        function renderRegionBuffer(region) {
            return new Promise(function (resolve, reject) {
                var buffer = geoWriter.write(region);
                L.geoJson(buffer, {
                    style: {
                        weight: 2,
                        color: "#999",
                        opacity: 1,
                        fillColor: "#B0DE5C",
                        fillOpacity: 0.8
                    }
                }).addTo(map);
                resolve(region);
            });
        }

        function renderBoringData(points) {
            L.geoJson(points, {
                onEachFeature: onEachFeature,

                pointToLayer: function(feature, latlng) {
                    return L.circleMarker(latlng, {
                        radius: 8,
                        fillColor: "#ff7800",
                        color: "#000",
                        weight: 1,
                        opacity: 1,
                        fillOpacity: 0.8
                    });
                }
            }).addTo(map);
        }

        createRegionBuffer()
//        .then(renderRegionBuffer)
        .then(readBoringData)
        .then(renderBoringData);
    </script>
</body>

</html>

マップは国土地理院のタイルと、日本シームレス地質図を使用している。

Read more ...

QGISによる空間演算

2015/02/26
電子国土Webシステムのサポート終了により、下記サイトでボーリング柱状図が地図上に表示できないのでなんとかする。

KuniJiban 国土地盤情報検索サイト

キーワードによる検索も可能だが、愛媛県に絞った検索は難しい。そこで「四国地方整備局」のキーワード検索の結果を、スクレイピングでぶっこ抜いた情報から、愛媛県だけを取り出してMy Mapsにプロットしてみる。
検索結果は約100ページ。取得にはiMacrosを使用する。ブラウザの操作を自動化するアプリで、「画面を保存して[>次へ]ボタンを押す」といった操作が自動化できる。

iMacrosの使い方 コマンド徹底解説

[ページめくりマクロの例]
VERSION BUILD=8890130 RECORDER=FX
TAB T=1
SET !EXTRACTTESTPOPUP NO
SET !LOOP 1
WAIT SECONDS=5
TAG POS=1 TYPE=TABLE ATTR=ID:searchResult EXTRACT=TXT
SAVEAS TYPE=HTM FOLDER=* FILE=+{{!NOW:yyyymmddhhnnss}}
TAG POS=1 TYPE=A ATTR=TXT:次へ>

この例だと、ページ毎のhtmlファイルが、ドキュメントフォルダのiMacros\Downloadsに保存される。htmlファイルは拡張子をEXCELのxlsに変更するだけで、テーブルのフォーマットを保ったまま、EXCELできれいに読み込めるのでいい感じに整形する。検索すれば複数のEXCELのBOOKをを結合する方法はいろいろあるが、最悪手作業でコピペ。
ちなみにハイパーリンクのURLが欲しい場合、マクロを使用しないと抜き出せないようだ。
'セル内のハイパーリンクの抜き出し関数
Function GetHyperlink(sRange As Range) As String
    Dim sp As Shape
    If sRange.Hyperlinks.Count > 0 Then
        GetHyperlink = sRange.Hyperlinks(1).Address
    End If
    For Each sp In ActiveSheet.Shapes
        If sRange.Address = sp.TopLeftCell.Address Then
            GetHyperlink = GetHyperlink & vbLf & sp.Hyperlink.Address
        End If
    Next
End Function

また、60進数の緯度経度が使用されているので、10進数に変換しておく必要もある。
=LEFT(E2,FIND("°",E2)-1)+MID(E2,FIND("°",E2)+1,FIND("′",E2)-FIND("°",E2)-1)/60+MID(E2,FIND("′",E2)+1,FIND("″",E2)-FIND("′",E2)-1)/3600
といった手間暇をかけてCSVに落とし込む。
ボーリングID,事業名,調査名,機関名称,緯度(60進),経度(60進),緯度(10進),経度(10進),掘進長(m),孔口標高(m),柱状図URL,土質試験結果URL,XML SK50337475003,,昭和63年度赤之井橋地質調査業務,松山河川国道事務所,33°59′10.2980″,133°33′39.0450″,33.9861939,133.5608458,13.5,18.6,http://www.kunijiban.pwri.go.jp/column/?xml=/SK/DATA/BEDSK50337475003.XML,,http://www.kunijiban.pwri.go.jp/data/SK/DATA/BEDSK50337475003.XML
SK50337485001,,昭和60年度川之江三島バイパス測量及び実施設計業務委託,松山河川国道事務所,33°59′14.5980″,133°33′56.5440″,33.9873883,133.5657067,10.15,15.67,http://www.kunijiban.pwri.go.jp/column/?xml=/SK/DATA/BEDSK50337485001.XML,,http://www.kunijiban.pwri.go.jp/data/SK/DATA/BEDSK50337485001.XML
SK50337495001,,昭和54年度11号線道設置に伴う地質調査,松山河川国道事務所,33°59′57.1930″,133°33′48.0430″,33.9992203,133.5633453,22.5,5.09,http://www.kunijiban.pwri.go.jp/column/?xml=/SK/DATA/BEDSK50337495001.XML,,http://www.kunijiban.pwri.go.jp/data/SK/DATA/BEDSK50337495001.XML
SK50337631001,,鮎戸瀬地区地すべり調査外1件,徳島河川国道事務所,33°56′57.2290″,133°45′53.8840″,33.9492303,133.7649678,21,188.5,http://www.kunijiban.pwri.go.jp/column/?xml=/SK/DATA/BEDSK50337631001.XML,,http://www.kunijiban.pwri.go.jp/data/SK/DATA/BEDSK50337631001.XML

しかしこのデータには、愛媛県をダイレクトに識別できる情報が位置情報しかないので、QGISを使って空間演算により愛媛県のみを切り出す。

QGISのプロジェクトの空間参照システムは、距離を使用するので、JDG2000/CS IV(EPSG:2446)にしておく。

行政区域データは、せっかくなので全国版のデータをダウンロードして、愛媛だけ切り出して使用する。

国土数値情報 行政区域データの詳細

ボーリング柱状図のCSVファイルの読み込みについては下記を参照。データの空間参照システムはJDG2000(EPSG:4612)。たぶん。

4.位置情報付きCSVファイルの読み込み - QGIS入門

両方を読み込んだ状態。

[属性テーブルを開く]から愛媛県の行政区ポリゴンの選択する。きれいに並んでいるので単純に選択すれば済むのだが、無駄に[式を使った地物選択]を使ってみる。こんな感じ。

愛媛県のすべての行政区ポリゴンが選択できるので、[編集]-[地物のコピー]&[編集]-[新規レイヤへの地物貼り付け]-[新規ベクタレイヤ]にする。

このままだと、愛媛県の境界にぎりぎり入っていない場所や海中が拾えないので、境界線を5km広げる。
[ベクタ]-[空間演算ツール]-[バッファ]を選択する。空間参照システムはJDG2000/CS IV(EPSG:2446)にする。

CSVから読み込んだボーリング位置は、そのままだと空間演算に使用できなかったので(5kmを分秒で指定すればいける?)、一度Shapeファイルに書き出す。レイヤーを右クリックして[名前を付けて保存]。空間参照システムはJDG2000/CS IV(EPSG:2446)にする。
切り出す。[ベクタ]-[空間演算ツール]-[クリップ]を選択する。

切り出し完了。

あとはレイヤー(clip)を、[名前を付けて保存]から形式をCSVで保存し、Googleドライブにアップロードする。
下記のマイマップで、位置をGoogleドライブからインポートする。Google Mapの空間参照システムはWGS 84(EPSG:4326)だが、JDG2000とほとんど変わらないそうなので、10進に変換した緯度経度のカラムをそのまま使用した。もしかすると元のデータがJDG2000ではなくWGS 84なのかも?

マイマップ

下記が大変参考になる
カッパ出没マップを作成する
Read more ...

Windowsでのnode.js環境の作成

2015/02/22
パッケージ管理ソフトChocolateyをインストールする。
Chocolatey Gallery

PowerShellは管理者として実行する。
PS C:\> Set-ExecutionPolicy RemoteSigned
PS C:\> iex ((new-object net.webclient).DownloadString('https://chocolatey.org/install.ps1'))
※Windows7だと.net関連を追加でインストールするため結構かかる

ツールをインストールする。
PS C:\> cinst python2
PS C:\> cinst ruby
PS C:\> cinst mongodb
PS C:\> cinst msysgit
PS C:\> cinst poshgit
PS C:\> cinst PhantomJS
PS C:\> cinst Cygwin -o -ia '-q -N -R C:\tools\cygwin -l C:\tools\cygwin\packages --packages wget, tar, openssh, bzip2 -s http://ftp.iij.ad.jp/pub/cygwin'
PS C:\> cinst cyg-get

node.js用にnodistをインストールする。
nodistはChocolateyでもインストールできるが、古い&まだベータ版(インストールしてみたけどがっかりだった)なので、GitHubからとってきて入れる。ここではPowerShellを使ってアーカイブをダウンロードしたが、gitコマンドが使える環境であればgit cloneする。
PS C:\> (New-Object Net.WebClient).DownloadFile('https://github.com/marcelklehr/nodist/zipball/master','C:\tools\nodist.zip');(New-Object -com Shell.Application).NameSpace('C:\tools').CopyHere((New-Object -com Shell.Application).NameSpace('C:\tools\nodist.zip').Items(),16)
フォルダはnodistにリネームしておく。

nodistが使用する環境変数を設定する。
README.mdにあるsetx /M PATH "path\to\nodist\bin;%PATH%"で設定したら、システム環境変数のPATHが消えてえらい目にあった…。
PS C:\> [Environment]::SetEnvironmentVariable('NODIST_PREFIX', 'C:\tools\nodist', 'Machine')
PS C:\> [Environment]::SetEnvironmentVariable('NODIST_X64', '1', 'Machine')
PS C:\> [Environment]::SetEnvironmentVariable('PATH', [Environment]::GetEnvironmentVariable('PATH', 'Machine') + ';' + 'C:\tools\nodist\bin', 'Machine')
PS C:\> [Environment]::SetEnvironmentVariable('NODE_PATH', 'C:\tools\nodist\bin\node_modules', 'Machine')

環境変数を反映させるためPowerShellを再起動して、nodistでnode.jsをインストールする。
PS C:\> nodist selfupdate
PS C:\> npm config set prefix %NODIST_PREFIX%\bin (なくても動くっぽい)
PS C:\> nodist
(x64)
> 0.12.0  (global)

YEOMAN, grunt, その他をインストールする。gemでSSLのエラーが出るのでhttpも追加しておく。
PS C:\> npm install -g yo grunt-cli bower
PS C:\> npm install -g generator-angular-fullstack
PS C:\> gem source -a http://rubygems.org/
PS C:\> gem install compass
Read more ...

Fedora 21にRedmineをインストール

2015/02/16

パッケージのインストール

SELinuxのためにpassengerはパッケージで入れる。libxml2-devel、libxslt-devel、ImageMagick-develは、gemのインストール痔に必要。
# yum groupinstall 'Development Tools' # yum install setroubleshoot-server setools-console # yum install mariadb-server mariadb-devel # yum install ruby-devel rubygem-bundler mod_passenger # yum install libxml2-devel libxslt-devel ImageMagick-devel # yum install ipa-pgothic-fonts

MariaDB(MySQL)の設定

/etc/my.cnf.d/server.cnf
...... # this is only for the mysqld standalone daemon [mysqld] character-set-server=utf8 ......
/etc/my.cnf.d/mysql-clients.cnf
...... [mysql] default-character-set=utf8 ......

MariaDBの起動とユーザ/テーブルの作成

# systemctl start mariadb # systemctl status mariadb # systemctl enable mariadb Created symlink from /etc/systemd/system/multi-user.target.wants/mariadb.service to /usr/lib/systemd/system/mariadb.service. # mysql_secure_installation # mysql -u root -p MariaDB [(none)]> create database redmine default character set utf8; MariaDB [(none)]> grant all on redmine.* to redmine@localhost identified by '********'; MariaDB [(none)]> flush privileges; MariaDB [(none)]> exit;

Redmineのインストール

# svn co http://svn.redmine.org/redmine/branches/2.5-stable /usr/share/redmine # cd /usr/share/redmine
config/database.yml
production: adapter: mysql2 database: redmine host: localhost username: redmine password: ******** encoding: utf8
config/configuration.yml
production: email_delivery: delivery_method: :smtp smtp_settings: address: "localhost" port: 25 domain: 'example.com' rmagick_font_path: /usr/share/fonts/ipa-pgothic/ipagp.ttf

Gemのインストール

# bundle config build.nokogiri --use-system-libraries# bundle install Don't run Bundler as root. Bundler can ask for sudo if it is needed, and installing your bundle as root will break this application for all non-root users on this machine. Fetching gem metadata from https://rubygems.org/......... Resolving dependencies... Installing rake 10.4.2 Installing i18n 0.6.11 Installing multi_json 1.10.1 Installing activesupport 3.2.21 Installing builder 3.0.4 Installing activemodel 3.2.21 Installing erubis 2.7.0 Installing journey 1.0.4 Installing rack 1.4.5 Installing rack-cache 1.2 Installing rack-test 0.6.3 Installing hike 1.2.3 Installing tilt 1.4.1 Installing sprockets 2.2.3 Installing actionpack 3.2.21 Installing mime-types 1.25.1 Installing polyglot 0.3.5 Installing treetop 1.4.15 Installing mail 2.5.4 Installing actionmailer 3.2.21 Installing arel 3.0.3 Installing tzinfo 0.3.43 Installing activerecord 3.2.21 Installing activeresource 3.2.21 Using bundler 1.7.6 Installing mini_portile 0.6.2 Installing nokogiri 1.6.6.2 Installing xpath 2.0.0 Installing capybara 2.4.4 Installing ffi 1.9.6 Installing childprocess 0.5.5 Installing coderay 1.1.0 Installing rack-ssl 1.3.4 Installing json 1.8.2 Installing rdoc 3.12.2 Installing thor 0.19.1 Installing railties 3.2.21 Installing jquery-rails 3.1.2 Installing metaclass 0.0.4 Installing mocha 1.0.0 Installing mysql2 0.3.17 Installing net-ldap 0.3.1 Installing ruby-openid 2.3.0 Installing rack-openid 1.4.2 Installing rails 3.2.21 Installing rbpdf 1.18.5 Installing redcarpet 2.3.0 Installing request_store 1.0.5 Installing rmagick 2.13.4 Installing rubyzip 1.1.7 Installing websocket 1.2.1 Installing selenium-webdriver 2.44.0 Installing shoulda-context 1.0.2 Installing shoulda-matchers 1.4.1 Installing shoulda 3.3.2 Installing yard 0.8.7.6 Your bundle is complete! Use `bundle show [gemname]` to see where a bundled gem is installed. Post-install message from rmagick: Please report any bugs. See https://github.com/gemhome/rmagick/compare/RMagick_2-13-2...master and https://github.com/rmagick/rmagick/issues/18

Redmineの初期設定とデータベースのテーブル作成

# bundle exec rake generate_secret_token # RAILS_ENV=production bundle exec rake db:migrate

SELinuxまわりの設定

RedmineをSELinuxが有効なCentOS上で動かすには - C#などの技術メモ
http://d.hatena.ne.jp/myoshino2011/20131230/1388416394
# setsebool httpd_run_stickshift 1 # getsebool httpd_run_stickshift httpd_run_stickshift --> on # semanage fcontext -a -s system_u -t httpd_sys_content_t "/usr/share/redmine(.*/)?(.*)" # restorecon -R -F /usr/share/redmine/ # chown -R apache:apache /usr/share/redmine

httpd設定

/etc/httpd/conf.d/redmine.conf
# # Redmine is flexible project management web application. # <virtualhost *:80> ServerName redmine.example.com DocumentRoot /usr/share/redmine/public <directory /usr/share/redmine/public/> <ifmodule mod_authz_core.c> # Apache 2.4 Require ip 192.168.1.0/24 Require ip 127.0.0.1 </IfModule> <ifmodule !mod_authz_core.c> # Apache 2.2 Order Deny,Allow Allow from 192.168.1.0/24 Allow from 127.0.0.1 </IfModule> #Uncomment the next line if using with SSL/TLS #php_flag session.cookie_secure on AllowOverride All </Directory> </VirtualHost> # systemctl start httpd.service # systemctl status httpd.service # systemctl enable httpd.service Created symlink from /etc/systemd/system/multi-user.target.wants/httpd.service to /usr/lib/systemd/system/httpd.service. # firewall-cmd --add-service=http --zone=FedoraServer # firewall-cmd --add-service=http --zone=FedoraServer --permanent
さて、これで起動できるわけだが、[管理]メニューにアクセスするとエラーになる。しかし、1度setenforce 0してからアクセスすると、エラーがでなくなる。SELinuxが関係しているのは間違いなさそうだが、ざっと見動いてるのでもういいや(゚∀゚)
Read more ...

複数のGoProの画像を一括で補正する

2015/02/14
GIMPを使います。

[ファイル]-[Batch Image Manipulation Plugin]を選択。
[Add]をクリックして[Other GIMP procedure]を選択。

 [plug-in-lens-distortion]を選択。これは[フィルター]-[変形]-[レンズ補正]に相当する処理です。変形パラメータを入力して[OK]。

さらにPNG->JPEGのフォーマット変換もかけるため、[Change format and compression]を追加。

JPEG設定。

最後に[Add images]ボタンから変換するファイルを選択し、[Output folder]で出力先を指定して、[Apply]で変換開始。

下記はffmpegを使用して、動画から1秒毎に1枚画像を切り出す処理。しかし画質がイマイチだったため、VLCのSS機能を使用した。
C:\Program Files\WinFF>ffmpeg.exe -i "D:\Desktop\GOPR0032.MP4" -f image2 -vf fps=fps=1 D:\out\shot%05d.jpg

動画をフレームにバラして変換をかけてから再度結合すれば、動画の補正もいけるかも?
Read more ...

PostGISインストール

2014/11/08
地図情報を外部へ提供し、JavaScriptやQGIS等と連携させるために、PostgreSQLでジオメトリ情報が扱えるように拡張するPostGISを使用する。

インストールと初期設定
# yum install postgis postgresql-server # postgresql-setup initdb Initializing database ... OK # passwd postgres ユーザー postgres のパスワードを変更。 新しいパスワード: 新しいパスワードを再入力してください: passwd: すべての認証トークンが正しく更新できました。
外部からのサーバへの接続を許可する # firewall-cmd --permanent --add-service=postgresql # firewall-cmd --add-service=postgresql
/var/lib/pgsql/data/pg_hba.conf
: : # IPv4 local connections: host all all 127.0.0.1/32 ident host all all 192.168.1.0/24 md5 : :
# vi /var/lib/pgsql/data/postgresql.conf
: : #listen_addresses = 'localhost' # what IP address(es) to listen on; listen_addresses = '*' # comma-separated list of addresses : :
サービスの起動と動作確認 # systemctl start postgresql # systemctl enable postgresql # su - postgres $ echo "select * from postgis_version();" | psql gis postgis_version --------------------------------------- 2.1 USE_GEOS=1 USE_PROJ=1 USE_STATS=1
DBの作成 $ createdb gis -E UTF-8 $ psql -d gis -c "CREATE EXTENSION postgis;" $ psql -d gis -c "CREATE EXTENSION postgis_topology;" $ psql -d gis -c "ALTER USER postgres PASSWORD '********';"
pgAdmin3をインストールする。
pgAdmin: Download - Windows ™

shapeファイルのコンバータをプラグインとして利用する。PostGISの本体に入っている。

Windows版のzipをダウンロードして、binの下のpostgisguiディレクトリをpgAdmin3のインストールディレクトリにコピーする。
Index of /postgis/windows

C:\Program Files (x86)\pgAdmin III\1.18\plugins.d\plugins.iniに下記を追加する。
; ;PostGIS shp2pgsql-gui (Windows): ; Title=PostGIS Shapefile and DBF loader Command="$$PGBINDIR\postgisgui\shp2pgsql-gui.exe" -h "$$HOSTNAME" -p $$PORT -U "$$USERNAME" -d "$$DATABASE" -W "$$PASSWORD" Description=Open a PostGIS ESRI Shapefile or Plain dbf loader console to the current database. KeyFile=$$PGBINDIR\postgisgui\shp2pgsql-gui.exe Platform=windows ServerType=postgresql Database=Yes SetPassword=Yes
pgAdmin3を起動して、[ファイル]-[オプション]で、PG binパスを確認する。


PostGISに接続する。


 プラグインを起動する。


[Add File]をクリックして、読み込むShapeファイルを選択する。


日本語のファイル名は読み込めないので、下記を参考にリネームしておく。
海岸線 CstLine
街区の代表点 SBAPt
街区線 SBBdry
基準点 GCP
軌道の中心線 RailCL
建築物 BldA
建築物の外周線 BldL
行政区画 AdmArea
行政区画界線 AdmBdry
行政区画代表点 AdmPt
水域 WA
水涯線 WL
水部構造物線 WStrL
水部構造物面 WStrA
町字の代表点 CommPt
町字界線 CommBdry
等高線 Cntr
道路縁 RdEdg
道路構成線 RdCompt
標高点 ElevPt

[Options]をクリックし、エンコーディングをCP932(or SHIFT-JIS)指定する。


[Import]をクリックすると読み込みが始まる。完了するとテーブルができている。


動作確認はQGISでやるとよい。
データの格納と表示 — Let's Postgres
Read more ...

GeoTiffからGeopaparazzi用のタイルを作成する

2014/11/05
「住宅地図を既存地図に重ねる」で作成したGeoTiffを、Android用のフィールド調査アプリGeopaparazziで読み込めるように変換する。
OSGeo4W Shellを起動する。

gdal2tiles.bat -z 10-21 D:\Desktop\yogo2_modified.tif D:\Desktop\yogo2 で変換開始。


yogo2フォルダに下記のファイルができる。openlayers.htmlを開くと、ブラウザでマップが確認できる。このyogo2フォルダを、外部メモリモードで接続したAndroidのmapsディレクトリにフォルダごとコピーする。

mapsディレクトリに下記のyogo2.mapurlファイルを作成する。centerの値はtilemapresource.xmlのBoundingBoxの値から中心を計算して設定する。
url=yogo2/ZZZ/XXX/YYY.png minzoom=10 maxzoom=21 center=132.73221620 33.8093724916 type=tms
mapsフォルダの中は下記になっているはず。

Geopaparazziを起動して、右上の設定メニューから「タイルソースの選択」をクリックし、転送したyogo2を選択する。

完成。赤い線はGPSトラッキング。
Read more ...

住宅地図を既存地図に重ねる

2014/11/05
地図の取り込みは、ほとんどの画像フォーマットをサポートしている。PDFもOK。地図の変形と座標合わせにはQGISを使用する。基盤情報地図を参照して合わせるので、対象の地区の地図をロードしておく。
QGISを起動して、メニューの[プラグイン]-[プラグインの管理とインストール]から「GDALジオリファレンサー」プラグインをインストールする。

メニューの[ラスタ]-[Georeferencer]-[Georeferencer]から起動する。

メニューの[ファイル]-[ラスタを開く]からファイルを開く。今回は住宅地図をスキャンした画像を使用したが、航空写真などでもよい。この時、空間参照システムを選択する必要がある。リファレンスに使用する「基盤地図情報」は、「JGD2000/Japan Plane Rectangular CS IV(EPSG:2446)」(中国・四国地区)なので、同じ座標系を設定する。
ちなみに、今回使用したスキャン画像は13000X11000ピクセルのPNGフォーマット。この時点でファイルサイズは4MBある。リファレンス後に出力されるGeoTiffファイルは500MB程度になるので、HDDに十分な空きのある環境で行うこと。

住宅地図を基本地図に投影するためのリファレンスになる点をプロットしていく。ジオリファレンサーの住宅地図側のマップをクリックすると地図座標入力のダイアログが開くので、「マップキャンバスより」をクリックして、基本地図側の対応する場所を指定する。

OKで決定する。リファレンスは多いほうがよい。四隅と中央あたりの最低でも6点は欲しい。

入力が完了したら、[ファイル]-[ジオリファレンシングの開始]から変換を開始する。変換タイプは下記で指定してみた。

変換が終わったら読み込んでみる。シェイプファイルと同じように、変換後のGeoTiffファイルをレイヤーにドラッグアンドドロップする。レイヤーは一番下がよいでしょう。

完成。
Read more ...

QGISで基盤地図情報を使う

2014/11/04
国土地理院のサイトから地形データを取ってくる(アカウントが必要)。
基盤地図情報ダウンロードサービス

データフォーマットをQGISで読める形式に変換する必要があるので、下記をダウンロードしておく。
基盤地図情報ビューア

今回使用する地図情報は「基盤地図情報基本項目-JPGIS(GML)形式」。


2次メッシュごとに細かく分割されていて、地図から選択すると割とめんどくさいので、リストから対象市区町村を選択して一気にダウンロードするとよい。


ダウンロードしたファイルを展開すると下記のようなファイルが入っている。フォーマットの変換はzipファイルのままで行うので展開しなくてよい。

松山市街のメッシュコードは下記。他の地区のメッシュコードは「地図上で標準地域メッシュを確認するページ」で確認できる。

ダウンロードしておいた「基盤地図情報ビューア」をインストールして起動する。変換したい地区のファイルをドラッグアンドドロップする。メニューの[エクスポート]-[エクスポート]を選択。変換種別は「シェープファイル」。取りあえず全部変換する。出力先フォルダの指定も忘れずに。


QGISを起動して、出力先フォルダを開き、変換したシェープファイル(拡張子.shp)を全て選択する(CTRLかSHIFTを押しながら)。

選択したファイルを、真下のレイヤウインドウにドラッグアンドドロップすると地図が表示される。


必要ないレイヤーを非表示にしたり、色を変えたり、町名や街区を表示したりして、満足できる地図ができたら、[プロジェクト]-[名前を付けて保存]から設定をセーブする。
Read more ...